Google Tag Manager: Part 2 - Getting Started
As we briefly reviewed in a previous blog post, Tag Manager is a relatively new offering from Google. One of the uses of Google Tag Manager is the flexibility it offers website owners to take back control of their Google Analytics implementation.
The first step in getting started with Google Tag Manager (GTM) is to surf to the GTM site and sign up for an account at google.com/tagmanager. When you first sign in, you automatically get one account. The account is simply an organizational tool to keep track of multiple websites. Google recommends using a single account unless you deal with multiple businesses – in which case you would create a different account for each business.
Within each account, multiple containers can be created. This is the basic grouping for related tags, so probably all Google Analytics items would go into one container. Name the container whatever you like (maybe something like “Analytics”), give it a time zone, and the domain of the website. Every container has a short piece of code, that looks like the following, and can be found under the “Settings” menu in Google Tag Manager:
<!– Google Tag Manager –>
<noscript><iframe src=”//www.googletagmanager.com/ns.html?id=GTM-XXXX”
height=”0″ width=”0″ style=”display:none;visibility:hidden”></iframe></noscript>
<script>(function(w,d,s,l,i){w[l]=w[l]||[];w[l].push({‘gtm.start’:
new Date().getTime(),event:’gtm.js’});var f=d.getElementsByTagName(s)[0],
j=d.createElement(s),dl=l!=’dataLayer’?’&l=’+l:”;j.async=true;j.src=
‘//www.googletagmanager.com/gtm.js?id=’+i+dl;f.parentNode.insertBefore(j,f);
})(window,document,’script’,’dataLayer’,’GTM-XXXX’);</script>
<!– End Google Tag Manager –>
Similarly to Google Analytics, to make GTM work, this has to be placed on every page on the website, immediately after the opening <BODY> tag. For those websites that already have Google Analytics, the code for Analytics should be taken off the site since this will be used instead. But before erasing the old GA code, make sure you note the Google Analytics tracking ID (the sting of characters that looks like GA-XXXXXXX-X) because this will have to be used in the next step.
A container can be used for many more purposes than Google Analytics, but for now we’ll add the elements to this container for Google Analytics tracking. Inside the container, there are two very important components that we’ll use now – tags and rule. The rules tell GTM when to do something, while the tags tell GTM what to do. While the rules will be very important later, for now we need to create a Google Analytics tag.
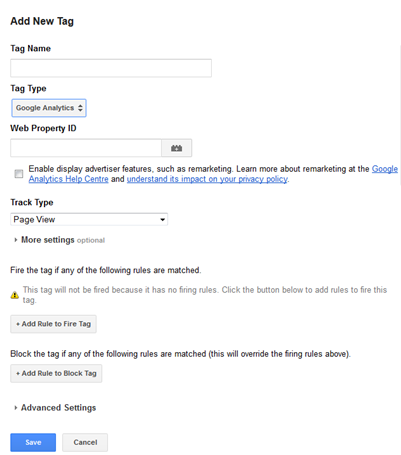 Choose the option to add a new tag, and give your tag a name. This tag is going to be used to capture Google Analytics data, so give it the name “Google Analytics”. Set the tag type to Google Analytics (or Universal Analytics if you’ve already made the change). Next, put in your web property ID from your Google Analytics account. Remember, this looks something like UA-12345678-1.
This tag will be capturing website interactions for Google Analytics. Up to this point, we’ve told the tag to interact with Google Analytics, and what our property ID is so that information can be credited to the proper account. Now, we need to tell the tag exactly what to send to our Google Analytics account.
The Track Type should already be set to Page View. Most of the basic Google Analytics information all boils down to which page the user is looking at, and what time it was brought up – in other words, Page Views. Make sure this is set properly.
The final piece that you need is to tell the tag when to fire, and this is mandatory. Under the “Add Rule to Fire Tag” button, there will be an option that says “All Pages”. Select this, then save your rule. And now you’re done! Your Google Analytics information will now be updated through Google Tag Manger.
But, what’s going on with these rules? It may seem a bit counter-intuitive if you’re used to Google Analytics. After all, with Google Analytics, all you had to do was put the code on every page you wanted tracked, and it would all be handled. Why add the extra step?
The concept here is a bit different from Google Analytics. When you put the Google Analytics code on your site, it says “Connect to Google Analytics and record information about this page”. With Google Tag Manager, the code being put on your site doesn’t do that. It simply says “Go to Google Tag Manger and find out what I have to do with this page”. The rules in Google Tag Manager then take over. Why is this necessary? Because with Google Tag Manger, you can add extra rules that only fire on certain pages or in certain instances. With our Google Analytics tag, we want it to fire on every page, so we have to tell it to fire on every page. This is not the behaviour we will want with all of our tags. That is why it has to be specified for each and every tag.
In the next installment of this series, we will look at creating Google Analytics events with Google Tag Manger.